Step 9: Formatting Values
Step 9: Formatting Values
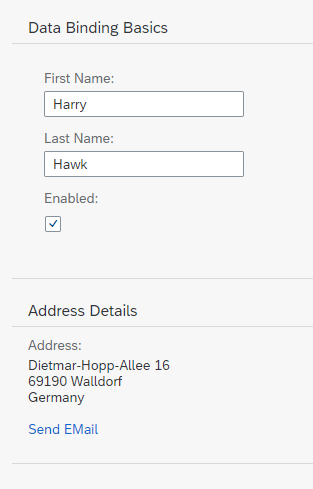
Preview
Coding
You can view and download all files in the Demo Kit at Data Binding - Step 9.
webapp/controller/App.controller.js (New)
sap.ui.define([
	"sap/ui/core/mvc/Controller",
	"sap/m/library"
], function (Controller, mobileLibrary) {
	"use strict";

	return Controller.extend("sap.ui.demo.db.controller.App", {
		formatMail: function(sFirstName, sLastName) {
			var oBundle = this.getView().getModel("i18n").getResourceBundle();
			return mobileLibrary.URLHelper.normalizeEmail(
				sFirstName + "." + sLastName + "@example.com",
				oBundle.getText("mailSubject", [sFirstName]),
				oBundle.getText("mailBody"));
		}
	});
});
Create a new folder controller within your webapp
folder as a general location for all controller files for this app and create a new
file App.controller.js.
In our custom formatter, we define the first and last name that are currently in the model as function parameters. When a user changes the data in the model by entering a different name in the input fields, our formatter will be invoked automatically by the framework. This makes sure that the UI is in sync with the data model.
In the formatMail function, we use the sap.m.URLHelper.normalizeEmail function that expects an e-mail
address, a mail subject and a text body. When a user chooses the link, the default email client will open with these parameters.For more information, see API
Reference: sap.m.URLHelper.normalizeEmail. The mailSubject resource bundle text
will contain a placeholder for the first name of the recipient (see below). Therefore, we provide the name with
[sFirstName].
For a detailed description of the e-mail link format, see https://developer.mozilla.org/de/docs/Web/Guide/HTML/Email_links.
webapp/view/App.view.xml
<mvc:View controllerName="sap.ui.demo.db.controller.App" xmlns="sap.m" xmlns:form="sap.ui.layout.form" xmlns:l="sap.ui.layout" xmlns:mvc="sap.ui.core.mvc"> <Panel headerText="{i18n>panel1HeaderText}" class="sapUiResponsiveMargin" width="auto"> <form:SimpleForm editable="true" layout="ColumnLayout"> <Label text="{i18n>firstName}"/> <Input value="{/firstName}" valueLiveUpdate="true" width="200px" enabled="{/enabled}"/> <Label text="{i18n>lastName}"/> <Input value="{/lastName}" valueLiveUpdate="true" width="200px" enabled="{/enabled}"/> <Label text="{i18n>enabled}"/> <CheckBox selected="{/enabled}"/> </form:SimpleForm> </Panel> <Panel headerText="{i18n>panel2HeaderText}" class="sapUiResponsiveMargin" width="auto"> <content> <l:VerticalLayout> <Label labelFor="address" text="{i18n>address}:"/> <FormattedText class="sapUiSmallMarginBottom" htmlText="{/address/street}<br>{/address/zip} {/address/city}<br>{/address/country}" id="address" width="200px"/> <Link href="{ parts: [ '/firstName', '/lastName' ], formatter: '.formatMail' }" text="{i18n>sendEmail}"/> </l:VerticalLayout> </content> </Panel> </mvc:View>
For more complex bindings we cannot use the simple binding syntax with the curly
braces anymore. The href property of the Link
element now contains an entire object inside the string value. In this case, the
object has two properties:
-
partsThis is a JavaScript array in which each element is an object containing a
pathproperty. The number and order of the elements in this array corresponds directly to the number and order of parameters expected by theformatMailfunction. -
formatterA reference to the function that receives the parameters listed in the
partsarray. Whatever value is returned by the formatter function becomes the value set for this property. The dot (formatMail) at the beginning of the formatter tellsSAPUI5 to look for aformatMailfunction on the controller instance of the view. If you do not use the dot, the function will be resolved by looking into the global namespace.
When using formatter functions, the binding is automatically switched to "one-way". So you can’t use a formatter function for "two-way" scenarios, but you can use data types (which will be explained in the following steps).
webapp/i18n/i18n.properties
…
# Screen titles
panel1HeaderText=Data Binding Basics
panel2HeaderText=Address Details

# E-mail
sendEmail=Send Mail
mailSubject=Hi {0}!
mailBody=How are you?
webapp/i18n/i18n_de.properties
…
# Screen titles
panel1HeaderText=Data Binding Grundlagen
panel2HeaderText=Adressdetails

# E-mail
sendEmail=E-mail versenden
mailSubject=Hallo {0}!
mailBody=Wie geht es dir?
And we add the missing texts to the properties files
Parent topic: Data Binding